Creating a web-enabled USB drived with WebUSB
I got caught in the crossfire of adapting one of my projects (PolyPasswordHasher, if you’re curious) to support two factor authentication recently. One of the goals that I had prepared for the summer was to have an actual demo website in which someone could register a yubikey and log in to a website using PPH + HOTP (I’ll leave the reason as to why HOTP out of this post) without too much hassle.
Sadly, the ecosystem for browser USB extensions feels like a wasteland:
- You could write a plugin, but that’s incredibly insecure and close to being deprecated in one or two years.
- You could use chrome’s USB extension library but, guess what, it’s also going to be deprecated.
- You can also try to ship a binary with a browser extension but that would start more cross-platform compatility problems than I’d like to list here.
This leaves out to a somehwat experimental technology: webUSB.
Enter WebUSB
WebUSB is a (finally!) standarized technology to provide a USB bridge so websites can connect to users’ USB devices using JavaScript. You can look at it as if the website was providing you with a USB driver along the two tonnes of JQuery it uses to make rounded boxes in your site.
This may sound like a security nightmare, at least during its first impression. Shipping code that has access to the user’s hardware sounds somewhat problematic. However, webUSB is an improvement security-wise if you consider the previous alternatives:
- It’s not code running outside of a sandbox, like a flashplugin would be.
- Permissions must be granted by the user to allow a website to access a usb device explicitly.
- Some devices, like USB keyboards, are not accessible to webusb (e.g., to avoid keylogging)
That being said, I wouldn’t be surprised if someone finds a way to abuse it during these early stages.
Besides the security aspects of webusb, the only drawback that I found is that, well, there is not much documentation on how to write a webusb device handler. Here, I’ll document how I ‘reversed’ (I could’ve just read the code for their open-source tools, but that’s not fun) and wrote a webusb driver for a yubikey with HOTP enabled.
Setting up your dev environment
In order to develop for webusb, you need to move a couple of things around. First, you need the latest(-ish?) version of chromium. Second, you need to run it with a couple of flags and a local webserver to serve your webusb JavaScript flies. Third, you may need to enable a couple of flags within chromium to enable experimental features.
Start chromium like this:
$ chromium --disable-web-security --allow-insecure-localhost
The reason as to why is that we’ll be serving the files using a plain http server from python (you can use whatever makes you happy here though). By default, webusb is not enabled if the content is not served through HTTPS and the certificate is trusted (++ for security here). A complete list of flags can be taken from this site in case you’re curious, although you don’t need more than these two.
Finally, depending on how old your version of chromium is, you may need to enable the experimental features by navigating to chrome://flags and enabling a flag called “Experimental web platform features.” If you have done this, then you will need to restart your browser.
After setting up chromium, you can start serving your local WebUSB files like so:
$ python3 -m http.server
Cool! Now you should be able to navigate to localhost and play around with webusb and your device.
Sniffing the USB device
Another necessary task is to understand what the original usb driver is sending to the USB device in order to replicate it. Although you may want to write something that already has an implementation using other libraries (e.g., libusb), or a specification describing these tasks, you may run into devices that are not documented (again, this wasn’t the case of the yubikey device, but I still opted for not checking the docs). If you’re under the third case and there are no documents on how to interact with your device, a simple pcap using wireshark can work wonders.
Setting up wireshark for USB sniffing
Under linux, wireshark needs to have a couple of modules loaded and permissions changed so you can sniff usb traffic. The instructions are taken from this article, but I’ll inline the linux instructions anyway.
First, load the usbmon kernel module:
$ sudo modprobe usbmon
This will create a series of /dev/usbmonN devices. You need to make them readable by regular users:
$ sudo setfacl -m u:USER:r /dev/usbmon*
Having done this, you can launch wireshark and pick up an inerface to sniff. Which one to pick can be easily seen using dmesg. Launch dmesg on follow and then plug in your device. You should see something like this:
[ 6350.949823] usb 1-4: new full-speed USB device number 9 using xhci_hcd
[ 6351.093360] input: Yubico Yubikey NEO OTP+CCID as /devices/pci0000:00/0000:00:14.0/usb1/1-4/1-4:1.0/0003:1050:0111.0006/input/input22
[ 6351.150902] hid-generic 0003:1050:0111.0006: input,hidraw0: USB HID v1.10 Keyboard [Yubico Yubikey NEO OTP+CCID] on usb-0000:00:14.0-4/input0
The important bits of this part of the log is the usb 1-4 part. This means it was connected to the usbmon1 interface. you can also know what “address” Wireshark will use from the information on the rest of the line (1.9.x). A sample wireshark capture of a packet going to our USB device would look like this:
398 19.946717 host 1.9.0 USB 72 URB_CONTROL out
This was a packet sent from your computer into 1.9.0, the device that was just connected. Using Wireshark, we can capture the “conversation” made between the laptop and the Yubikey (or any other device) and sort-of, tell what’s exactly being sent and received.
In this case the host sends a series of URB_CONTROL_OUT message(s) with certain flags and the challenge to hash, then waits for a status flag to be set on the replies and starts reading the resulting HOTP hash. You can see the relevant bits of the conversation on packets 8 to 47 in this pcap.
Translating Sniffed packets into webusb calls
Now that we know what we need to do, we can try to replicate the behavior using webusb to interact with our devices. For example, the details of the packet I listed above are as follows:
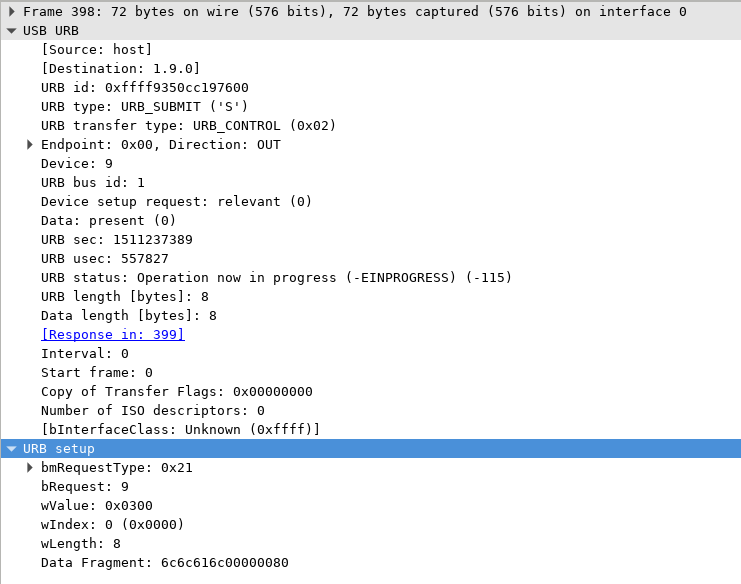
This can be translated into the following webusb call:
Device.controlTransferOut({
    "recipient": "interface",
    "requestType": "class",
    "request": 9,
    "value": 0x0300,
    "index": 0 }, Data);
You may suspect that some of the values on the wireshark scan are the same as the arugments sent to the control transfer out. Well, it is that simple. If you don’t want to understand what these values mean (I certainly won’t cover them here), you could just blindly build the same request and see how the device behaves.
These calls return a promise object, which resolves with the data that the device contains after our call. We would have to chain these promises to effectively have a conversation with our yubikey. However, this may not be as straightforward as with other approaches.
Fun with promises
The webusb API is reliannce on promises, makes writing driver-like code a little weird. This is because webusb is merging two worlds: one with the weird JavaScript “asynchronicity” on the web-space and the structured-protocol, raw-byte-handling world of low-level device interaction. This construction will often lead to a design pattern: nested-promises. At least in my very humble opinion.
A nested webusb promise, in simple terms is something that does the following:
- Start a promise by sending a request. The result will be handled by another promise
- The second promise will check whether the request is read (i.e., the read
frame says “good to go”):
- If it’s not ready, start another promise exactly like the one in step 2.
- If it is ready, then move on and resolve the “outer” promise so we can continue onwards to the next step.
This may be easier to picture in the diagram below.
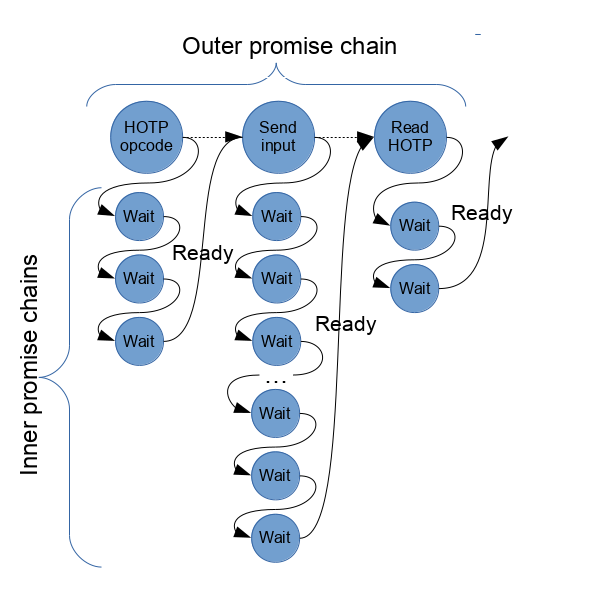
This construction makes it so that the outer promise can construct a promise chain that follows a structured protocol such as the one used by the Yubikey HOTP interface. In contrast, the inner promise chain will make the outer promises hold on until the device is ready for the next step.
This way, we can write a usb device handler that looks pretty much like the drivers you would write with libusb, but using the async and pretty JavaScript-y API of webusb.
Writing webusb handlers/drivers is rather fun and easy once you get started. Reversing usb devices is a fun side-project that may keep you interested/busy for a good week while learning a little about the things we plug into our computers every day.